Sunday, April 27, 2014

Summertime - Grill Time!!

I've been away for a while but now I'm back with a vengeance... OK, maybe not a vengeance per se but definitely with enthusiasm!

Lately I've been working on making custom aprons for friends and family gifts.  They were a big hit and everyone has been encouraging me to start selling them so I put a few on Etsy and have spoken with a few local shops about carrying them!
Batter Up baseball apron


Smooth Mooooves apron

Men's Camo grilling apron
I've been having a lot of fun coming up with new and unique ideas.  The grilling aprons are particularly popular now that we're finally snow free!  I was beginning to think it was never going to happen lol.  If you want to check out my Etsy shop, the name is ADKdreams.

Thursday, January 16, 2014

My Muse

MY MUSE

She left. She packed her bag and slipped out as I paid her no attention. The note she left filled in the blanks. She told me that I had stopped trying; I had stopped striving for more. She told me that I'd been ignoring her and that I no longer valued her presence in my life. She was right. Days...even weeks would go by that I would forget to admire her beauty, ignore her longing pleas for attention. She deserved more. She deserved to be appreciated; to have her allure reveled in... her playfulness welcomed. She deserved to have her praises sung... her multitude of glories exalted before anyone who would listen. More importantly, if no one else would listen, she deserved my unwavering awe and appreciation. I don't know where she's gone; I don't know how to find her. If I did find her, could I ever convince her that things would be different? That I would honor her in a way she deserves? I don't know the answer but I do know that my life without her will be cold and dark.

Tuesday, October 15, 2013

Customizing your Day Planner - making a good planner into the perfect planner!

I have a confession:  I'm absolutely addicted to day planners, calendars, to-do lists ~ you name it....pretty much anything in an office supply store.  I walk through Staples the way a little kid walks through Toys R Us at Christmas (and, wonder of all wonders, my fiance has the same irrational love of office supplies that I do!  What are the odds?!?).  At the end of every year I make my pilgrimage to Barnes & Noble (my preferred day planner store) to pick out my day planner for the next year.  I wander around, get the lay of the land, gather up a half dozen or so day planners, find a comfortable chair that I can lounge in and start the heart-wrenching comparison process.  There are so many features that go into picking the perfect day planner - size, color, design, adequate space for appointments and notes, whether or not it comes with cool event stickers.  The sad fact is that I rarely find one that has everything I want; the great design has sub-par room for appts, the great stickers come with no month calendar at the beginning of each month...you know how it goes. 

Last year, I found my dream day planner - a gorgeous pink leather one (for breast cancer awareness) with pages for notes, a two-page monthly calendar at the beginning of each month, two-page weekly calendars, pages for phone numbers, plastic card holders and a zip pocket - you name it, this baby had it.  What it also had was a $60+ price tag.  That was NOT going to happen; $15 is pretty close to the top end of the price range that I'm willing to pay for a day planner.  I sadly gave up my dream of owning this lovely leather day planner.  Until one beautiful summer day in 2013 when I happened across one at a yard sale....for $3 - YEAH, $3!  Not only that, but I asked her if she would take $2 - and she did!  I could barely contain myself....I was giddy with joy.  After I gleefully paid for my beautiful new day planner, I climbed back into the truck to check that baby out.  It was brand new!  It was from 2011 but the calendars didn't have numbers on them so I was able to set them up for 2013 with no problem. 

Despite the fact that it was my dream planner, there were still some items that I wanted that hadn't come with it.  The first thing I did was to sit down and make a list of things I might want to have in my dayplanner; these are some of the things I came up with:  I like having my monthly budget close at hand - that way I know, every week, what bills I need to pay.  I take numerous meds (I was injured and recently had surgery) and have a very hard time keeping track of when I'm due for a refill so I wanted a tracking system for my meds.  A list for gift idea tracking and sizes, grocery list, meal planner, pain log, craft ideas, blog ideas, workout log, etc.  Next step was to narrow down my options and decide which ones I couldn't live without. 

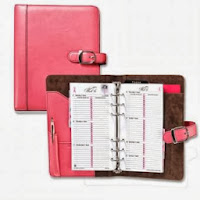
Ooooooooo, nice, right?!?
After I made my choice, I opened MS Word and made a template for my documents. It's important to know what size you need your sheets to be so that they fit well with the rest of the pages.  If you've never created a custom-sized page, it's very simple:
1)  Click on the Page Layout tab
2)  On the Page Layout tab, click on the drop down arrow that says Page Setup
3)  When the Page Setup dialog box opens, click on tab labeled "Paper"
4)  The first option is to adjust the paper size; The first drop-down box will default to Letter 8.5x11in so you need to change this to custom size.  Once you've changed the default, you can enter the dimensions you need (my pages needed to be 5.5 inches wide and 9 inches tall so that's what I use)

Now you just need to make a table that fits your needs; for me, I set up a standard table that I was able to modify slightly for each of my pages.  Again, if you haven't made tables, it's pretty simple:
1)  Click on the Insert tab
2)  Click on the Table box - a dropdown will appear (this will consist of several boxes across and several down - as you mouse over these boxes, you can choose how many columns and rows you need)
3)  Adjust the size of your rows and column to your own need.
4)  Add titles to your columns
5)  If necessary, change the margin width so that your table is clear of the holes (I set my upper, right and bottom margins at .5 and my left margin at .7 to allow for the holes)
This is what my Bill Payment Schedule looks like:

Bill
Amount
Due Date
Paid?


After printing and saving this one, I made some minor changes to create my other pages:


Recipient Name
Gift
Where?
Size


You get the picture.  I made several and used my scrapbook paper cutter to get nice uniform pages and used an existing page to get my holes set where they need to be.  So, basically, I'm pretty thrilled with my "new" day planner....the only sad thing is that I won't need to shop for day planners anymore (for a while) but I still get to order refills and buy fun stickers ;c)


Wednesday, October 2, 2013

2013 Fall Mantel ~ Small Changes Make a Big Difference

This year I switched it up a little, trying for a new look.  My mom sent the large picture to us and it works great for the space.  On the left, I added a pot of orange flowers, a twig-framed picture of my fiance and her family, the yellow food scale (from the kitchen) and a candle holder with (battery-operated) candles that usually live on my windowsill in the kitchen.  On the right, I added a glass container with my stick colored pencils, a black candle, a rustic metal star and my pumpkins from last year that I revised with paint (I think they look less like cheap plastic dollar tree decorations (which they are) and more like real pumpkins).  Showing up again from last year are the leaves and flowers, the gold and orange Christmas ornaments, the orange vase, the bears and the sign. I brought out my cowgirl hat (last year's Halloween costume) and a small lantern filled with tiny pine cones.  On the stove, we have an antique iron, a couple candles and some berries (I'm still working on what to do with the berries ~ I never would have considered them for fall but I recently saw a fall mantle online and they looked great on it)
Painting I'm working on "Autumn Beauty"

Monday, September 30, 2013

The Easiest, Softest Chocolate Chip Cookies You'll Ever Have!


Today I'm going to give you something for which you'll thank me forever; I'm going to give you the easiest, best chocolate chip cookie recipe you'll ever have.  Now, I do ask that you refrain from giving this recipe to anyone else because it's a treasured family recipe - passed down through generations, from my great great grandmother (or my Mom found it in a magazine when I was a teen....either way, you'll thank me).  If you don't like soft, gooey chocolate chip cookies, then this recipe is not for you.  If you want your cookies with a crisp bottom, then this recipe is not for you.  With that said, here's the recipe!

Chocolate Chip Cookies

1 cup unsalted butter, at room temperature
3/4 cup brown sugar
1/4 cup granulated sugar
3.4 oz. package vanilla instant pudding mix
2 large eggs
1 teaspoon vanilla extract
2 1/4 cups all-purpose flour
1 teaspoon baking soda
1/2 teaspoon salt
2 cups semi-sweet chocolate chips (I only use one cup)
nuts (optional)

Directions:

1. Preheat oven to 350 degrees F. Line a baking sheet with parchment paper or silicone baking mat and set aside.

2. Using a mixer, beat together butter and sugars until creamy. Add in pudding mix, eggs, and vanilla extract. In a separate medium bowl, whisk together the flour, baking soda, and salt. Add the dry ingredients to the wet ingredients and mix until just combined. Stir in the chocolate chips.

3. Drop cookie dough by rounded teaspoons onto prepared baking sheet.  Bake for 8 - 10 minutes, or until slight golden and set. Remove cookies from oven and let cool on baking sheet for two minutes. Transfer to a cooling rack and cool completely. (hahaha yeah right!  Let's be honest here, they'll be half gone before you can get them to the rack)


 The beauty of these cookies lies in the addition of the instant pudding; this keeps the cookies soft and moist as long as you can keep them in your cookie jar (which admittedly, is probably not very long, but if, by some miracle, they lasted a week, they'd still be soft and yummy).  The second amazing benefit from using instant pudding?  You can substitute any darned flavor of pudding you want for the vanilla and substitute any kind of chips or fruit for the chocolate chips!!  Just think of the possibilities!  Chocolate cookies with butterscotch chips, coconut cream with vanilla chips, pumpkin spice with chocolate chips!  The combinations boggle the mind!  Let me know what combinations you've come up with!


Saturday, September 21, 2013

Fall Decorating! How to Put Together a Beautiful, Simple and Cheap (but not cheap looking) Fall Mantel

Fall has arrived! (at least in our neck of the woods)  Fall is very possibly my favorite time of year (or summer) (maybe Christmas) (ergh, idk...don't make me choose!) because I love the beautiful explosion of colors.  And of course, being a ginger, this is my color palette! All of the greens trying to hold on as long as they can, the oranges, rusts, yellows....yeah, fall is a beautiful time of year up here in the Adirondacks.  I really enjoy bringing the beauty of the outside into my home so almost all of my fall decorating is nothing more than natural (although not always real) items.  Below is a picture of the fall mantle that I put together last year and I'll go over some items and why I did what I did.


The first thing to do is set out all of the decorations you have; this will help you start thinking about what you need and where you can place them.  The two framed pictures were the first things I placed; the one on the left I put flat on the mantle, while the one on the right is raised up a little bit.  These pictures are ones that I painted but there is no end to the things you could use here - how about a cheap piece of scrapbook paper (less than $1) with beautiful fall colors in a dollar store frame? why not google fall pictures which can be printed and framed? a simple scrapbook sheet with a fall poem or saying printed on it? (one of my very favorites is "October's Party" by George Cooper ~ if you haven't ever heard of it, you should read it)  After the pictures, I gathered up some of my fake pumpkins (all from the Dollar Tree) and put three of them at different levels - this gives them a little personality and helps to hide the fact that they're all identical (this year, I'm going to try a little paint on the pumpkins to make them look a little more realistic).  In front of the other picture, I placed a bouquet of gorgeous (fake) fall flowers and some cattails all in a mayonnaise jar wrapped in burlap (how's that for cheap?).  I went through my house and picked out some candles that had nice fall colors, a jug of maple syrup and a rustic candle holder that is now holding a large pinecone (far right, but you can see it better in the close up below).  On the right side, I took a simple orange vase (99 cents at Sally Ann's) and filled it with pinecones (from my yard).   I then took several more of the flowers (as used in the vase), leaves and pinecones and scattered them randomly across the mantle, changing and rearranging until I had it how I liked it.  Of course my dancing couple, my plaque and the bears had to stay.  Some people like to decorate so that everything is uniform - each side of the mantle mirroring the other.  Personally, I like to make it asymmetrical and put things at varying heights (as with the pictures and pumpkins) - I just think it has more personality.


Close up of the left side  (the glass pumpkin is one that I made at a glass-blowing course at Hands-On Glass in Corning, NY so much fun and reasonably priced so check it out if you're ever in the area!)


Close-up view of the right side (please, if you decide to use cattails as I have, use artificial ones...trust me, I learned this the hard way: the real ones eventually puff up and explode all over lol)


This is the perfect time of year to access your local thrift store! (who am I kidding? thrift shopping is a year-round treat for me!) Sally Ann's puts all of their glass/plastic decorative items together by color; this makes it easy for you to scoot right over to the fall colors and pick up some cheap accessories!  Look for colors and shapes that you like - they don't have to be specifically fall decorations just grab things that would work well in your home.  Don't limit yourself!!  Be creative and try looking at things in a different way. In fact, part of the fun of thrift stores is finding the hidden treasures ~ that neat wicker basket, the beautiful orange vase, anything that makes you think of a beautiful fall day - think warm and cozy and nature.

This is how I decorate our home at the beginning of September; as it gets closer to Halloween, it's easy to edit your mantle and other decorations to reflect a spookier look, and after that, you can take out the ghosts and ghouls and transition it into Thanksgiving with just a couple easy changes. The key is to have fun with it and make it something that you and your family will enjoy!

Several years ago, I went grape picking with some friends along the Finger Lakes Wine Trail.  As they picked grapes, I decided to pick up the grape vines that were no longer attached to the plants and weave them together into grape vine wreathes.  I made several simple wreathes during that visit that I used for years.  I like to take the wreathe and change it's decorations depending on the season; for fall, I would add leaves, small pumpkins orange tulle, a small scarecrow, maybe a crow for irony - most of which can all be found at your local dollar store.  If you don't happen to have access to a vineyard, a thrift store is a great place to find a cheap one - even if you have to remove the decorations that are currently on it (just make sure the wreath itself is in good shape).


** Important tip:  When you think you have everything where you want it, take a quick picture of it and then look the picture over closely; for some reason, this makes everything much more clear and I'm able to change things around to get a look that I like better!  This is also what I do with my paintings.


Blowing glass at Hands On Glass


                                                                    Final touches on my punkin


My wreath in it's Valentine's Day garb (I can't believe I couldn't find a picture of it dressed up for fall!)


My first mantle display
(I like the other one better but I was
 sad that my green glass vase broke)

Wednesday, September 18, 2013

Quickie Craft ~ DIY Boot Cuffs just in time for fall!

Have you seen these yet? 


They're boot cuffs and they're EVERYWHERE this fall (especially on Pinterest, where I spend waaayyy too much time) But, unfortunately, for such a small chunk of material, they carry a bigger pricetag than I'm willing to pay - I've seen them for $18 and up.  So, what would you say if I told you that you can have a customized pair for about $5 with very little effort?  Yeah, that's what I thought!  Here's the scoop:

1)  Go through your closet, looking for old sweaters that you still like the look of but maybe you're tired of wearing (I don't happen to have any of these because I recently gave away all of my cast-offs - in which case, skip to step 1b ;c)

1b) Go to your local Thrift Store/yard sale and scour the racks for an appropriate sweater.  I chose two sweaters - one super soft and snuggly sweater in gorgeous fall shades and one in white cable knit (straight to me from 1993, shoulder pads included)


** if you're shopping at Sally Ann's, make sure you check what color tag is half price; yellow
was the tag color of the day so the brown sweater was $3 and the white one was $2.50


2)  Cut off the sleeves anywhere from 3-8 inches depending on how much you want to show, how high you want them to go and how much you want to scrunch them:


3) Adorn the cuffs with buttons, lace, etc. or leave them as is if you want it simple and stylish

4) Pull the cuffs onto your legs with the finished edge facing up

5) Zip up your boots

6) Look adorable having spent very little money:


Yeah - you're welcome ;c)