Tuesday, August 27, 2013

Coming Up!

Last weekend, I found a rustic clock that I fell in love with.  It was almost $80.  NOPE.  The last few days I've been putting together my own version and chronicling the process.  I should have the tutorial up soon!

Update 10/19/13 - ok, so "soon" is a bit of an exaggeration ;c)  I've got the clock about 98% done, pictures to chronicle the process but.....every time I think about cutting out and arranging 35 teeny tiny sticks for the roman numerals....my enthusiasm just peters out.  Pathetic, huh? lol  One of these days, I'll get my butt around and finish the darned thing....I promise :c)

This is where I stalled :c(

Wednesday, August 21, 2013

Got A Minute? ~ Longer Life for your pens and markers

This is just a really simple tip but I'm amazed at how many people don't realize it! When storing pens, markers or paint pens, it's important to store them with the tip down to keep continuous flow and reduce the chance of the tip drying out. If you don't store your pens in the correct way, it could shorten the life and quality of the pen. (There are exceptions - one being fountain pens which may flood if stored nib down)
Ink goes to the top of the pen making it skip or stop writing altogether
 
Ink feeds to the tip, keeping it ready for use at all times

Monday, August 19, 2013

Christmas Countdown! What's in Store

I know it's a little early to be thinking of Christmas but my theme this year makes it crucial to get started now! I've always loved decorating for the holidays (and by holidays, I mean things start going up in September and they don't stop until after New Years) When my children were still toddlers and I was staying home with them, money was tight and I didn't have any extra to go out and spend on ornaments (not to mention glass ornaments and two tiny tots do NOT mix). My solution to this problem was to get a small (3 or 4 foot) tree and put it up on a coffee table. For ornaments, I went through the tons of toys spread from one corner of the house to another and picked out as many tiny, colorful toys that I could find and used them as ornaments. This was such a special tree and I regret so much that I don't have any pictures of it (the film was damaged). When the kids got older, we would take turns picking the theme/colors of our Christmas tree each year. Most years were pretty normal - red & green, the bright colors popular lately, silver and blue - until the year my son picked black. Black. For Christmas. My initial instinct was to talk him out of it and then I thought what the heck? Might as well give it a try. I found a white Christmas tree (never thought I'd get one of those lol) because black against the dark greens wouldn't be nearly enough contrast. Much to my surprise, the look was actually stunning! We ended up with the white tree and black ornaments (with some silver thrown in). Last year, I had just hurt myself at work (four herniated discs) and I was depressed and sore and didn't even bother to put up a tree because our kids (who live about 3 1/2 hours away) were not going to make it up. This year will be a particularly hard one, as my fiance just lost her mother and we're all having a tough time. I have, however, decided to make sure the tree is put up this year and my plan is for a beautiful, rustic country tree. We recently bought a lovely home in the Adirondacks and our decor is very ADK in style so I think it will be perfect! Because I have a world of resources outside my front door, I've decided to make as many of the decorations as possible, using natural items as much as possible. Other than some supplies here and there, I do not want anything that comes from the store; I want authentic nature and upcycled items that I already have. This is going to mean a lot of work but I spent the day searching and pinning ideas so stay close - there will be many how to's and pictures to come in the next couple months!


White tree with black ornaments - in progress**


White tree with multi color ornaments - I loved the look of this one!


Green tree with traditional colors

Saturday, August 17, 2013

What's on the Agenda, Ginger?

I've got so many crafts and projects on my to-do list (and on my Pinterest, and floating around in my head lol) so I decided to write down a few and hopefully motivate myself to pick up the pace, get off Pinterest and finish some things that are way overdue!!

1) Organizing my master closet
2) Organizing my craft room (aka the shelves in the corner of our guest bedroom)
3) Upcycling glass bottles to decorative and/or functional pieces
4) Making the clock I promised for my daughter's new apartment
5) Finishing the darned plaque I started for my new granddaughter's room
6) Making an outhouse plaque for our guest bathroom
7) Sewing curtains for the house
8) Finish stripping the kitchen and painting it
9) Ditto on the living room
10) Start making the ornaments for our Christmas tree (I want to do a completely homemade tree with very rustic ornaments)

This is just the tip of the iceberg so if anything above sounds interesting (or you have any suggestions) keep an eye on the blog!

Keep crafy!

~ Heather ♥

Tuesday, August 13, 2013

Tiny Changes - updating decorative frames

We bought our beautiful home in the Adirondack Park about a year ago and, truthfully, I've been negligent with some things. I've stripped the wallpaper in the kitchen (well about 2/3 of it) but it remains unpainted. *update: all kitchen walls have been successfully stripped and painted a lovely blue color 😁 In the living room, I ripped up the corner of wallpaper on one wall....yeah, let's not talk about the big jobs. One of the small things I'd still not updated from the original owners was a pair of picture frames on the sides of the kitchen cabinets that surround the window over the sink. These 5x7 frames had matted pictures of spices on them. Sounds ok for a kitchen, right? But these were old and faded and just not attractive.

I pulled the frames down (which they had adhered with sticky-back velcro -good idea!) and removed the pictures and mats. Ok, so I'm cheap and the thought of spending money on new mats just never crossed my mind. Not even once. I went to my crafts supplies and picked out some scrapbook paper that perfectly coordinated with the cabinets, floors and color scheme of the house. After that, I went on my computer and simply printed out two little pictures - one says "This home seasoned with love" and the other "eat, drink, be merry", added some cute pics to finish it out and then put the frames back together.

And last, but not least, I put the frames back up on the cabinets. Will anyone likely ever pay attention to them? Nah, probably not, but I like them, they make me smile and I can also convince myself that I really am getting things done around here! lol

For me, the cost was, at the very most, a penny or two (I already had scrapbook paper, the frames and the pictures were only printed on plain copy paper but you could very conceivably do your own for less than five dollars. The Dollar Tree has a variety of frames for (you guessed it) $1 each and any craft store will carry scrapbook paper for anywhere from 50 cents to a couple dollars. After that, all you would need is the sticky-back velcro!

Keep Crafty! ~ Heather ♥

Packing Light - REALLY light - aka How I Packed a Long Weekend Worth of Clothes in My Purse To Save Money

My daughter and I are getting ready to take a (somewhat) unexpected flight to Florida to see my parents. It's great, and we can't wait to see them but the truth is, this is a rotten time for unexpected expenses. I'm out of work because I had surgery so I'm trying to stretch 2/3 of my normal paycheck (haha, try that sometime!) but also, my daughter (who works and goes to nursing school) just had her car completely die....it held on a lot longer than we expected. So, the airline we're flying with not only charges for checking bags they now charge for a carry on too - the only thing you can take without a fee is a purse/briefcase etc. and the dimensions are 7x15x16...oy. Not a lot to work with right? Sounded like a challenge to me! We're flying out on a Thursday and will be driving back on Saturday night so I'll need four outfits including the one I wear on the plane. So, here goes! I originally planned on wearing a pair of bootcut jeans and my cowgirl boots on the flight but then realized that it's August in Central Florida....I really don't need heavy jeans and cowgirl boots no matter how cute they'd look, so I ended up with this light, comfortable outfit:

Then, I proceeded to pick out some easy, lightweight outfits that I could take with me. Now let me tell you that I am NOT a tiny little thing; I'm a size 14/16 so if you're a size 2 (first of all, I pretty much hate you....ok, no, just kidding) you could likely fit a lot more in your bag! This is what I ended up packing:
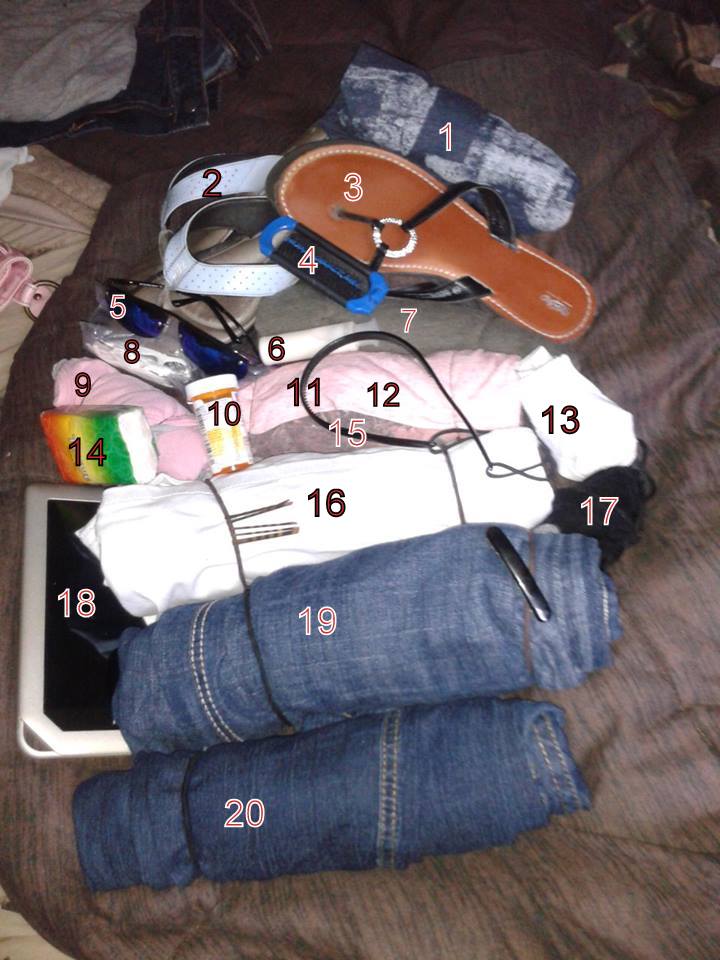
Somehow it doesn't look nearly as impressive on my screen as it does in reality. Here's a list of what I've packed:
1) Simple blue v-neck t-shirt rolled with a cami underneath
2) My comfy Nike cushioned sandals....I can't travel without them
3) Black sandals
4) Fold-up brush (I'm low maintenance but if I need more my sis-in-law will have it)
5) Sunglasses (or my regular glasses, depending)
6) Teeny tiny hand lotion in case I need it on the plane
7) Army green v-neck t-shirt
8) Toothpick/floss thingys just in case I need it on the plane (unlikely, I know, but it takes up almost no space)
9) Four pair of undies, rolled up
10) Any meds I'll need
11) Black elastic headband
12) Pink v-neck t-shirt with a burgandy cami under it
13) Two pair of socks
14) Tissue travel pack for plane
15) Gray shirt
16) White shorts
17) Little black bag holding my phone charger, Nook charger, headphones and a splitter in case my daughter wants to listen
18) My Nook (it's only a 2 1/2 hour flight but still lol)
19) Blue jean Capri
20) Skinny Jeans
I forgot to include my little wallet that I keep a credit card, driver's license and a few other necessities in the pic but it's fairly small:

Ok, it looks more impressive written out ;c)
The trick is to wear your heaviest shoes/boots/sneakers on the plane (yes it's less convenient than wearing flip flops while checking in, but trust me, it's much more efficient) The most important part of packing is rolling everything up as tightly as possible. Spread out your clothes, make sure they're neat and not balled up then just roll from one end to the other. After I'd rolled them up, I used small hair elastics and large hair elastics to hold them - this way it's keeping everything neat, compact and I can throw my hair up into a ponytail. Also, I clipped a couple barrettes and a half dozen bobby pins on the elastics that I used to hold my clothes. Once you've rolled everything, it's important to put it in your bag as efficiently as possible....it may take some patience and rearranging but it can be done. Male sure you put heaviest items on the bottom and use every bit of space. I put the two pairs of sandals on the bottom and then packed and rearranged until everything fit neatly inside. And it's all within the airline's size requirements! Take that airline lol


Keep Crafty!

~ Heather ♥

Update:  9/5/13 ~ I could have gotten away with a larger bag after all....my daughter used a bigger bag and they never batted an eye.  Oh well, I'm still proud of it lol